2016/7/16 16:56:57
I do a good bit of bass fishing and one of my favorite baits and one I use year round are lead head jigs. At $4 to $5 a piece loosing one can get a little expensive so decided to make my own jigs using a powder coat process. Powder paint is exactly as you would imagine. It is a very fine powder, available in different colors, that when heated will dry to a rock hard finish making it very durable. The best way to apply the powder is by using a fluid bed.
A fluid bed allows you to apply air to the powder and "fluff" it up, giving a more even coat when dipping heated jigs into the powder and allowing it to cure. Commercial beds can be expensive but you can easily make one using materials from your local hardware store.
Materials needed:
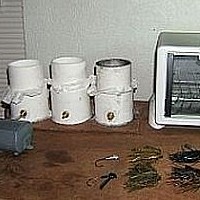
Making the fluid bed. Refer to the pic for a visual on this process
Cut the 3' PVC pipe into about 4" sections. I sand the edges so they will fit easily into the couplings used as the base. Drill about a 1/4 inch hold in the base to insert the air nipples. Clue the air nipples into the base to form an air tight seal. Also clue the base onto a short piece of wood or paneling. The base and air nipples must be air tight for this to work. I use a hot glue gun and apply a good coat around all edges to form the seal.
Place a round coffee filter on top of the base coupling. Position a section of the PVC pipe over the coffee filter and gently push this down into the base. If the filter tares then it must be replaced as this is what will be holding the powder in your fluid bed. Pour the powder onto the coffee filter. Connect the aquarium air pump and tubing to the air nipple on the base of the fluid bed. Your fluid bed is complete.
Making the jigs.
You can pour your own lead to make the jigs if you want. Lead, lead melting pots, molds, and hooks can be expensive so I prefer to buy unfinished jigs from suppliers like Janns Netcraft or other places. I fish around a lot of heavy cover so having a weed guard on the jigs is a must though it may have to be removed and replaced after the jigs is finished as they will melt when heated.
Note: Before I began to heat the jigs and prior to dipping, I rinse them in some vinegar to remove any oils or other substance that could cause an uneven coat when dipped into the powder.
Heating and dipping the jigs.
Hang the jigs in the toaster oven and let heat up. I set the temp around 250 F. Connect the air pump to the fluid bed and turn it on. Air is forced up through the filter and if working properly the powder will appear to be boiling like water. Adjust air flow as needed. After about 5 or so minutes the jig should be hot enough to process. Using the needle nose pliers to hold by the bend in the hook, dip the jig into the powder. Only takes about a second to cover the jig then place it back into the oven. Continue the process until all the jigs have been dipped into the base color of the powder.
I like highlights on my jigs so I then take the same jig and dip it into another fluid bed to add highlights like red, blue, or black flakes. Reheat the jig a little in the oven before doing this. After the dipping process then allow the jigs to cure in the toaster oven for about 10 to 15 minutes at 250-300 F.
Note: I place a small sandwich bag over the top of the fluid bed and seal with a rubber band when finished. The helps keep the powder from absorbing moisture and clumping up.
Once cooled you are basically finished and almost ready to go fishing. All you need now is adding some skirt material of the color of your choice. I like rattles on my jigs so add them also. Now for the best part. Put the jigs in your tackle box, put the tackle box in your boat, head to the lake, tie on your new jig, and enjoy your day. You'll get a lot of satisfaction when catching bass on the lures you make yourself.
The Best Virginia Beach Fishing Charter Deals
Taking a Virginia Beach fishing charter is a great vacation. If you love to fish or you just love t
Tips For Getting Started With Ice Fishing
Ice fishing for a beginner can be one of the worst fishing experiences or one of the best depending
Enjoy a Big Game Hunting Trip in USA
Adventure is a word which has infinite meanings and we all have our own way to feel the nerve
Contact management E-mail : [email protected]
Copyright © 2005-2016 Outdoor sports All Rights Reserved