The perpetuation of the many myths in traditional golf instruction has led to countless injuries, inconsistent results and a world of frustration. Simply swinging the golf club in the way that the body is designed to move will lead to greater consistency and greater enjoyment for a significantly longer time. The eight myths covered in this story are the classics, and I'm certain that just about every avid player has read or been taught at least one, if not all, of them at one time or another. Understanding why these traditional pieces of golf instruction are wrong for you, and how to fix them, will free you of some major obstacles and allow you to improve both your swing and your ballstriking almost immediately. Read on and get ready to improve.
Myth #1: When addressing the ball, bend from your waist or hips.  Fault: First of all, bones don't bend, which is exactly what the hips consist of. Bending from the waist produces a curve or slouch in the lower back, severely restricting rotation.
Fix: A proper setup must yield two things: balance and range of motion. A setup that doesn't allow for both to be maintained throughout the swing is flawed from the start. Range of motion is unrestricted when you bend from the hip joints. This puts the spine in a neutral position, which allows for maximum stability and mobility. If you sit on the edge of a chair with your back straight, you're bent at your hips.
Drill: Begin by standing tall with your feet hip-width apart. Take one hand and put it in the small of your back with your palm open and facing out. Now place a golf club in your hand, holding the shaft near the clubhead so that the shaft runs straight up your spine with the grip end against the back of your head. Maintaining these contact points with the club, bend forward from the hip joints. If the grip end of the club is still in contact with the back of your head while holding the end of the club in the small of your back, then you're bending properly. If not, it means you're either rounding your shoulders or bending from the waist, not the hip joints.

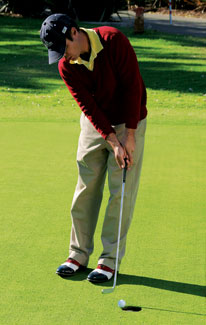
 Above, Left: Taking the club away with the left shoulder tends to create poor rotation and a disconnection of the arms. Notice how my arms and club don't make it to the top here. Above, Right: Using the right shoulder to initiate the takeaway creates a much fuller and more connected turn. Here, you'll notice that my shoulders have rotated freely.
Myth #2: Start the backswing with the left shoulder and hands. Taking the club away with the left shoulder tends to create poor rotation and a disconnection of the arms. Notice how my arms and club don't make it to the top here.
Fault: Beginning the swing this way restricts shoulder rotation and causes the club to get inside or behind your body.
Fix: Start the swing with the right shoulder. This keeps the hands in front of the chest and guarantees a full shoulder turn. By initiating the swing with the right shoulder, the entire body stays connected. Conversely, starting the swing with the left shoulder doesn't necessarily turn the right shoulder, creating a myriad of potential problems, chief among them, limiting the range of motion.
Drill: Cross your arms in front of you. Lift your elbows and forearms away from you until they're parallel to the ground. Start with your left shoulder, rotating it to your chin. Return to the beginning and start with your right shoulder. Notice how much easier it is to rotate the upper body.
Myth #3: Keep the left arm straight in the backswing.  Fault: This extension causes the left shoulder to fold in toward the chest, causing the upper body to stop turning and the arms to lift. In turn, this promotes the right shoulder to dip on the downswing. What's more important is where the chest is, because that's where the length of the arms is. When the club is extended back with a straight left arm, the chest doesn't rotate fully, limiting range of motion and weight transfer. Typically, this causes weak and poor contact.
Fix: Maintain the natural bend in the left arm, both at address and at the top of the backswing. This allows the shoulders to complete the backswing without dipping or lifting and prevents the hips and lower body from swaying. Instead, the chest is rotated for a full release to occur at impact.
Drill: Begin by addressing the ball. From the address position, hinge the club until it rests on your right shoulder. Now, complete the backswing so that your upper body is behind the ball. This demonstrates the correct position at the top of the backswing. Slightly lift the club off your shoulder, make your swing and hit the ball!
Myth #4: Hold the wrist angle for as long as possible.  Fault: Holding the wrist angle causes players to spin their hips, tilt and drop the right shoulder and work under the ball, resulting in pull cuts.
Fix: Approximately 75 percent of the clubhead speed at impact comes from the unhinging of the wrists on the downswing. Another 11 percent comes from the unhinging of the arms. Thus, 86 percent of clubhead speed comes from the arms and wrists unhinging. When the hands get thigh-high on the downswing, allow the wrists to unhinge. This will give a full release with more power and accuracy.
Drill: Players who try to hold the angle are depending on their lower body to drive them through impact. Instead, try holding the clubhead in your right hand and swing the club by only hinging and unhinging your arm and wrist. Feel the speed?
Myth #5: Keep the head still in the backswing.  Fault: A head that doesn't move in the backswing prevents the golfer from getting the upper body behind the ball. This will lead to swaying or a reverse pivot, with the majority of body weight placed on the front (closest to target) foot.
Fix: Allow the head to move toward the back foot on the second half of the backswing. This allows the chest to get behind the ball without swaying.
Drill: Put on a necktie. At address, when hanging straight down, the tie should fall in line with the tips of your toes. At the top of the backswing, the tie should now be pointing inside your right foot. If your head has remained still, the tie will point inside your left foot because your chest will not have moved behind the ball. Once you get the feel for this move, you should feel significantly more dynamic.
Myth #6: Stay behind the ball at impact.  Fault: This causes the golfer's right shoulder to dip and work under the ball, resulting in fat, thin, hooked or sliced shots.
Fix: At impact, the ball begins to climb the clubface, imparting backspin. The loft of the club determines the trajectory of the ball. The player must allow the head to move toward the target so that the chest can move forward and get the body in a stacked position with the shoulders over the hips. This will allow the player to trap and compress the ball, resulting in more distance and accuracy.
Drill: Make a half swing using just your chest, shoulders, arms and wrists. Allow the head to move back and forth with the clubhead. Focus on having the top groove strike the ball at or above the equator. In other words, cover the ball with the clubhead, or said another way, put a lid on the ball. Be certain to allow your head to move with the club. Myth #7: Take a wide stance for more stability, balance and power.  Fault: A wide stance limits the player's rotation in the hips and chest and prevents getting completely to the left side on the downswing. The only way to get behind the ball is to sway.
Fix: At address, the thigh bones and shin bones should line up to maximize stability and mobility. In other words, set the feet hip-width apart. This gets the joints stacked up and properly aligned for ease of movement.
Drill: Imagine yourself waterskiing. As you're being pulled behind the boat, you notice that your skis are hip-width apart. As the boat turns from side to side, you're able to glide easily through the water because your body is in perfect balance. As you widen your skiing stance, it becomes harder and harder to maintain control through the turns, until you finally lose your balance and wipe out! Remember to keep your feet hip-width apart.
_Ê
The notion that a wide stance leads to more power is incorrect. A stance that places the feet at shoulder-width will allow your body weight to shift freely.
Myth #8: The hips and stomach should face the target at impact.  Fault: This concept causes the hips to rotate too soon, causing the right shoulder to dip and the clubface to open. To square up the clubface, the hands must be manipulated. This is a leading cause of tendinitis in golfers.
Fix: Staying connected through impact causes the hips and shoulders to be in alignment, which yields greater ballstriking consistency and lessens injury to the lower back, shoulders, elbows and wrists. It also doesn't require manipulation of the golf club, allowing it to be released at the correct time.
Drill: Try to feel that your hands and zipper are passing through impact at the same time.
 _Ê
_Ê
At the top, you'll notice my hips have opened early and the clubface has overrotated. If you stay connected (above), the clubface will be square and your shots straight._Ê
Carl Rabito is a Master PGA Professional and strength and conditioning specialist. He currently teaches at Bowling Brook GC in Illinois and Sanctuary Ridge GC in Florida. For more info, visit www.carlrabitogolf.com.
Throwing Boomerang, the Instructions Guide

Why book your mt. apo climb with a legitimate company?

Copyright © www.mycheapnfljerseys.com Outdoor sports All Rights Reserved