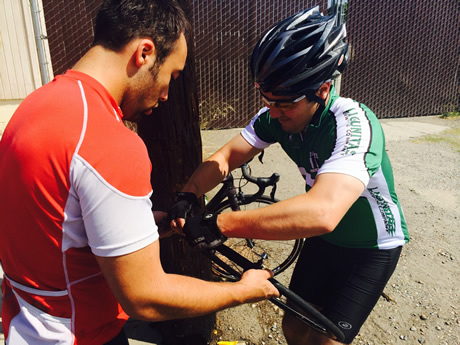
I love taking a new bicycle fresh from its cardboard wrapper, greasing the seat tube, installing the post, popping the bike into the stand for assembly. From that point, a zip-tied, foam-wrapped collection of parts becomes a bicycle for the first time. But good mechanics don't just assemble a bike. They tune it—checking brakes, wheels, shifting and adjusting the touch points to ensure that the rider's first impressions aren't marred by an issue with the equipment.
During the first few rides on even the best-tuned bike, however, as it settles in, cables stretch, components fall out of adjustment, and bolts loosen. (Take our quiz to test your Fix-It IQ to see how much you know about keeping your bike in top running shape.)
More: 5 Easy Ways to Make Your Bike Work Like New
These routine problems are remedied at the 30-day tune-up almost all shops include with the purchase of a new model. At Editors' Choice, I'm the bike shop—I have to be ready to keep a fleet of new bicycles rolling under a pack of editors. In addition to the predictable adjustments, I know by now to expect impromptu breakdowns from crashes, short stops, mis-shifts from riders bopping between all the different types of systems (mechanical and electronic), plus the early-season conditions of the road, which often includes razor-sharp gravel, sand and broken glass yet to be swept away by the first rains of spring.
Of course, I also must account for the tomfoolery that arises when you let a bunch of editors loose with bikes, like power slides and skidding contests. This year, we experienced an unprecedented number of breakdowns: zero. We did suffer one flat, but it was a slow leak that we found after pulling the bike from storage overnight. Good preparation played a role in this, but we were also lucky. Even if we'd suffered some mishaps, though, we were ready. Here's how we handle five of the most common hiccups.
10 Bike-Fix Tools Every Cyclist Needs
Crankarms are notorious for loosening after the first few rides. Modern versions that use a pinch bolt to secure the arms to the spindle are much more secure, but should still be checked within your first five rides, and periodically after that. More problematic are cranks with a tapered interface, such as the older square tapers, Octolink from Shimano, GXP from SRAM and all BB30 cranks from SRAM and FSA.
Fixing a loose crank on the road is simple: Just tighten the bolt with the appropriate hex wrench (or, for older cranks, a socket). Most crank bolts are either 8-or 10mm, and most multitools are equipped with this size. If yours isn't, use this trick, which sounds crazy, but works: Put two smaller wrenches into the bolt that equal its size, then tighten. During a group test a few years ago, I was able to turn a 10mm bolt using an 8-and 2mm hex together. It's not ideal, and you may have to stop periodically to retighten, but it beats pedaling home with one leg because the crank falls off.
4 Bike Repairs That'll Actually Save You Money
Spokes stretch a little when new, and nipples bed into the rim, which can cause a wheel to go out of true. To fix it, leave the wheel in the bike and run your hand over the spokes midway between the hub and rim. Feel for spokes that are looser than the others, and when you find them, tighten them just until they start to take up tension.
Watch our video below on how to true a wheel to follow along. (Many multitools have a small spoke wrench built in.) Once all the spokes are snugged to about the same tension, spin the wheel and, using the brake calipers as a sight guide (or, in the case of disc brakes, a frame or fork tube), locate the spot on the rim that's farthest out of whack. Tighten the spoke opposite that spot to pull it back toward center. Repeat until the wheel is relatively true, or at least good enough to get you home, where you can get the wheel checked and completely fixed. ( 6 Daily Bike Maintenance Checks
Many bikes have replaceable derailleur hangers, which are designed to bend or break rather than ruin the frame if the bike tips over or crashes. Sometimes, the derailleur hanger just gets tweaked, which upsets the alignment of the rear derailleur to the cogs and causes poor shifting. In the worst case, if you keep riding, you can shift the rear derailleur into the rear wheel.
To straighten a bent hanger until you can get it replaced (or in the case of nonreplaceable hangers, professionally aligned): Shift the derailleur to the smallest cog. Put the proper-size hex wrench in the bolt that mounts the derailleur to the frame and, with light force, bend the hanger until the derailleur aligns with the cog. Then, slowly shift to the second-largest gear and make sure the derailleur doesn't contact the spokes. Adjust the low limit screw so the derailleur won't go past this cog; this prevents you from getting into your lowest gear, but it's insurance that you won't ruin your wheel, derailleur, and frame—and possibly crash.
4 Smart Bike-Buying Questions
When the tire tears, the inner tube usually pops through the gash then explodes. To fix this, besides installing a new tube, you need to boot—or reinforce—the tire. Anything that will withstand the pressure of the tube in the tire will work as a boot.
I like Mylar wrappers from gels and nutrition bars; other things that work are duct tape, paper money and old sections of tires. Locate the cut in the tire (and mark it somehow if you can, for easy reference), then remove one side of the tire from the rim and replace the punctured tube with a fresh one. Put enough air in the tube to give it shape, then tuck the boot inside the tire so it covers the hole. The semi-inflated tube should hold it in place. Press the rest of the tire back on the rim, then inflate enough to hold your weight and allow you to ride. Don't forget to replace the tire when you get home.
More: The Anatomy of a Bicycle
If a pedal isn't installed tightly enough, the threaded portion of the spindle starts to wobble in the crankarm. Don't ignore an unsteady feeling at the pedal—if you keep riding, the rocking motion can destroy the threads and round out the hole, resulting in a trashed crank, a big repair bill and possibly an emergency call for a car ride home. To prevent this, all you have to do is snug the pedal into the arm.
But even if the pedal falls out of the hole, you might be able to get home—and save the crankarm. If the hole is still round and just the last few threads appear to be messed up, thread the pedal all the way into the hole from the back side of the crank, then remove it. This might recut the damaged threads enough to let you install the pedal from the correct side. If so, cinch the pedal down and get home without hammering—dental work is even more expensive than a new crank. Then hit the local shop to get the problem evaluated.
More: How to Avoid 5 Common Bike Repair Mistakes
Wiley X Moxy Sunglasses: Indestructible Protection & US Military Approved

Lake Fork Fishing Trip Recap: A Quick Half-Day Before Heading to Texas
Victoria Fishing Charters: Unforgettable Deep Sea & Coastal Fishing Trips

Copyright © www.mycheapnfljerseys.com Outdoor sports All Rights Reserved