2016/7/19 18:03:55

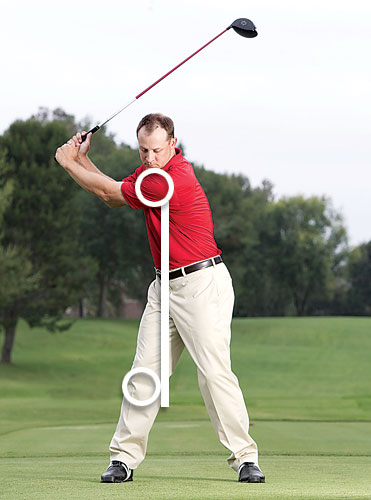
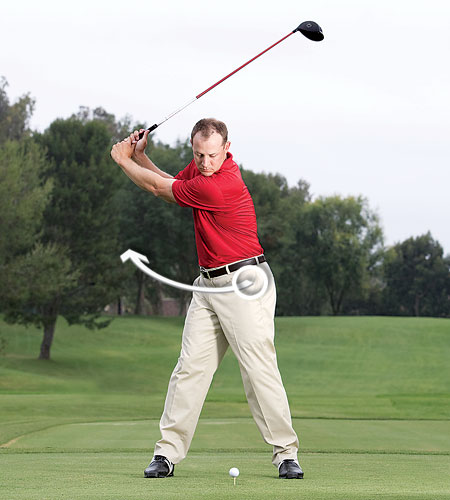
1. Four-Step Drill. At the top of your swing, if your body doesn't rotate properly so that your weight and balance are too much on your left side, (so that your body resembles a C), you'll not only lose a lot of power, but also slice or pull your shots. Rather than making this so-called reverse pivot, I tell my students to make sure that their left shoulder is over the inside of their right knee at the top of their swings.
If you struggle with shifting your weight, try the four-step drill I learned from Jim Flick. Do it slowly, making each step separate.
First, set up as usual. Then hinge the club up with your wrists and set it on your right shoulder, while keeping your arms relaxed and staying in your posture. Then–and this is the key step–keep the club on your shoulder and turn back so your left shoulder is over and inside your right knee. After that, simply lift the club off your shoulder and you'll be in a perfect position at the top of your swing. Now let your arms and the club swing down and let your body react to the swinging of the club. The club will fall to the inside of the target line, the clubface will square up, and you'll draw the ball.
 1
1
 2
2
 3
3
 4 LEFT SHOULDER INSIDE RIGHT KNEE
 PERFECT
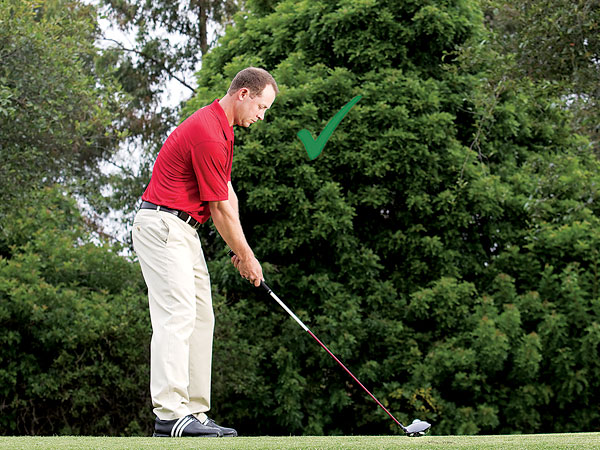
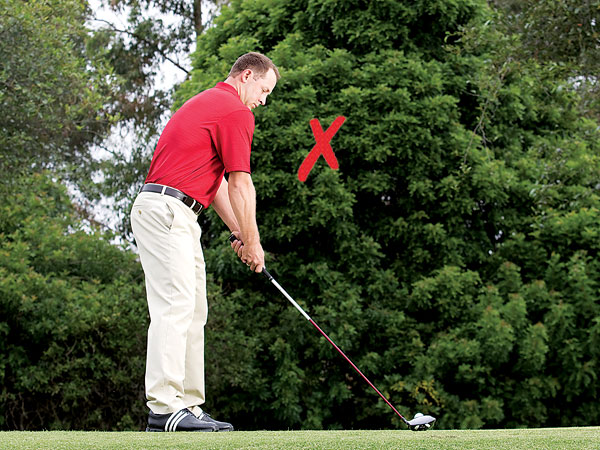
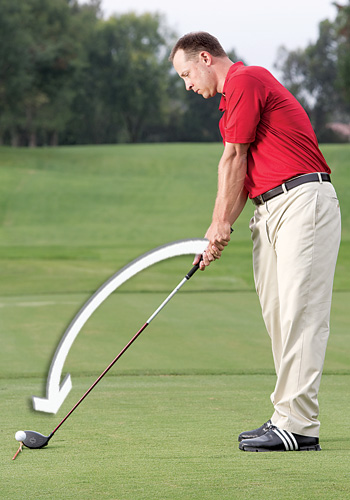
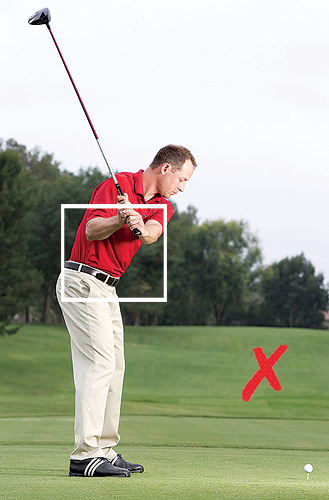
2. The Right Setup. When a player swings across the ball from outside the target line to inside it, he slices (or pulls) the ball and loses major power. This swing-path breakdown happens for a number of reasons. I'm going to address one of its causes as I see in many golfers' setups.
 RIGHT ARM TOO HIGH
Consider the top photo. Notice that my right forearm is parallel and slightly lower than my left forearm. (In fact you only see one of my forearms.) When your right forearm gets too high at address and you see both forearms, you'll either start your swing by taking the club outside the target line or twisting it too far inside. (See bottom photo.)
To get your right forearm in the proper parallel position, it has to be relaxed. Also consider strengthening your grip by rotating your right hand to the right so your right elbow points toward your right hip. When that happens, you'll know that your arms are in a good setup position. From there, you can start off your swing on the correct path.
 NO HIP TURN
 RIGHT POCKET BACK
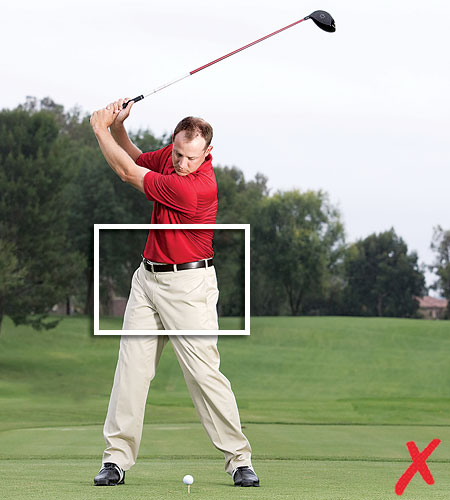
3. Right Pocket Back. When I watch golf on TV, I frequently hear the commentators remark about how much the players coil in their backswings. Look how far his shoulders turn, with very little hip turn! they say. While it's fun to watch the game's best players torque up, most golfers just don't have the flexibility to swing like the pros do. Weekend Warriors don't have the time to flex and stretch, and when they try to swing with a pro's typical coil, virtually nothing turns because they're so tight.
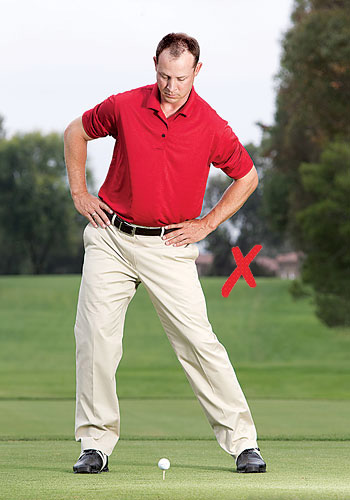

Unless you have the flexibility, time and talent, don't try to swing and coil like a pro. Rather, get loaded in your backswing. Think, as you swing the club back, of what Greg Norman used to say: R.P.B., or right pocket back. Thinking of moving your right pocket back will allow your right hip to turn back and stay level. Norman was one of the game's longest drivers. If that swing thought worked for him, I bet it'll work for you. Remember, if you allow your hips to turn freely, your shoulders will turn with them.
 FROM THE INSIDE
 ALONG THE TARGET LINE
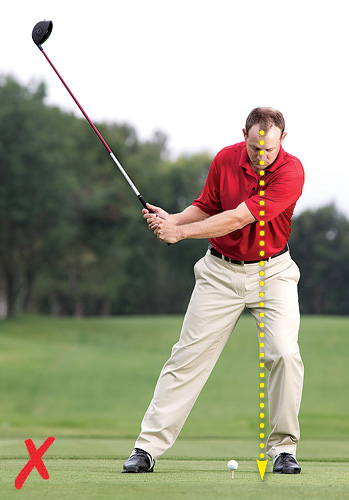
4. From The Inside. One of the driver swing's most difficult parts is the transition and downswing. Since the driver is the lightest club and we're trying to hit it the farthest, folks tend to try and power the ball with their body instead of using speed. But when you try to power the ball you tend to overuse your body, especially your shoulders. In the above photos, I've placed an alignment stick just outside the tee, pointing it directly down the target line. Now here's where many of my students get things wrong. The goal isn't to swing along the target line. Instead, you actually want to make contact with the ball via swinging from inside the target line. Because we swing in a circle that's on a tilt, swinging directly along the target line will require far too much manipulation of the hands and body, resulting in all sorts of bad positioning (above, right photo). So what to do? Swing every club from inside the target line. You'll see it's much easier than swinging down the target line.
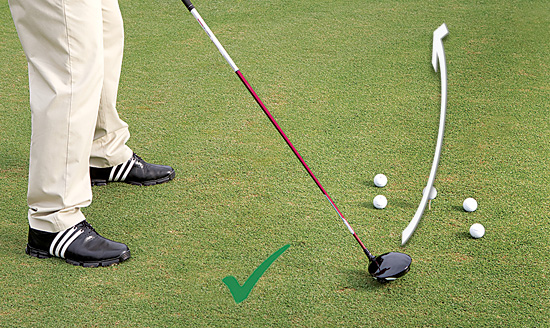
5. Gate Drill. As I mentioned earlier, swinging from outside the target line to inside it produces a glancing slice blow and a major power loss. If you slice it a lot and don't get enough power, try my gate drill.
Take either four golf balls or four tees and arrange them like you see in the photo. Put two balls on the far side of the ball you're addressing (so one is even with your ball and one is about two inches behind it) and two on its near side (so one is even with the ball and the other is two inches in front of it).
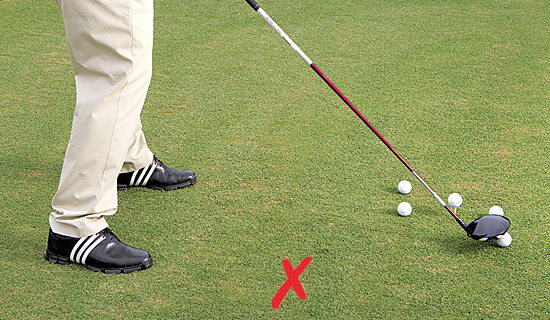
With an obstacle on the near side, the club must travel from the inside of the target line and outside it through the shot. Many times, people try to cheat doing this drill by pulling the club in closer at impact to avoid the outside golf balls. If you try to cheat, you'll hit the inside balls. Having all four golf balls gets you to swing on the proper path. After you're able to successfully complete the gate drill with some practice swings, hit some shots. The great thing about this drill is that it gives you instant feedback. Hit the gate and you know you're off track.
Another way to check your progress is to make a slow swing and stop at impact. If your clubface is square at impact, the toe and heel of the club should be even with the two balls in the middle.
 TENSION
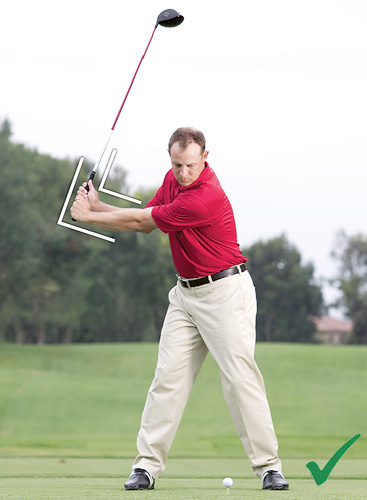
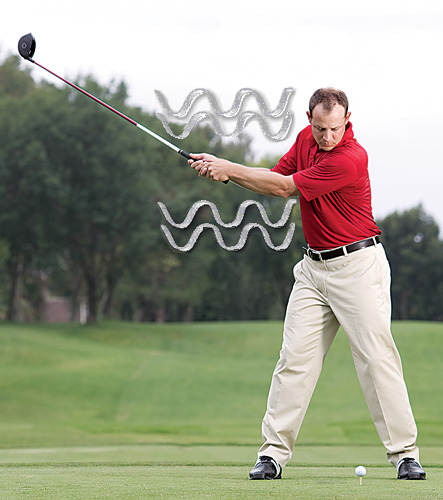
6. Hinge Your Wrists. Wrist hinge is one of the golf swing's biggest power sources. If you're able to keep the correct grip pressure and hinge the club in the backswing, then you're using one of the key levers in your golf swing.
Think about hitting a nail with a hammer–do you just move your arm or does your wrist hinge, too? (Which adds a snap and some speed?) I tell my students to get their wrists hinging pretty early in their swings, so when their arms are parallel to the ground in their backswing, their club points to the sky and forms a 90_¡ angle with their left arm (see photo). Don't tighten up like you see me doing in the small photo. Keep your wrist sockets relaxed so the club can hinge freely. Again, feeling it happen early in your swing is fine. As your arms swing back to start your swing, feel as if your left wrist is pushing and your right wrist pulling to help get the club to hinge properly.

7. Avoid The Changeup. When driving, your goal is to sync your body, arms and club so they produce the most speed. To do this, your head should be slightly behind the ball at impact. When golfers try to hit it hard, however, they often force their swings and get out of position. Their body moves too far forward and they lose power.
To stay in sync, consider this baseball analogy: Pitchers throw changeups so the batter swings out in front of the pitch. This sacrifices the batter's leverage and power. If you apply that lesson to golf, you realize that you don't want to get out in front of it. You want to stay back and let the clubhead swing past you and into the followthrough.
 HEELS UP!
If you feel like your swing is off-balance or that your body is getting too far out in front of the ball at impact, try lifting your left heel off the ground at address. Then swing, and keep the heel up throughout the swing, not letting it touch the ground. If you get too far forward in the downswing during this drill, your heel will touch the ground. This helps keep your weight from transitioning too far forward in the downswing. Swing easy at first, then, staying in balance, feel that the club swings past your body and that its speed takes you to your followthrough.
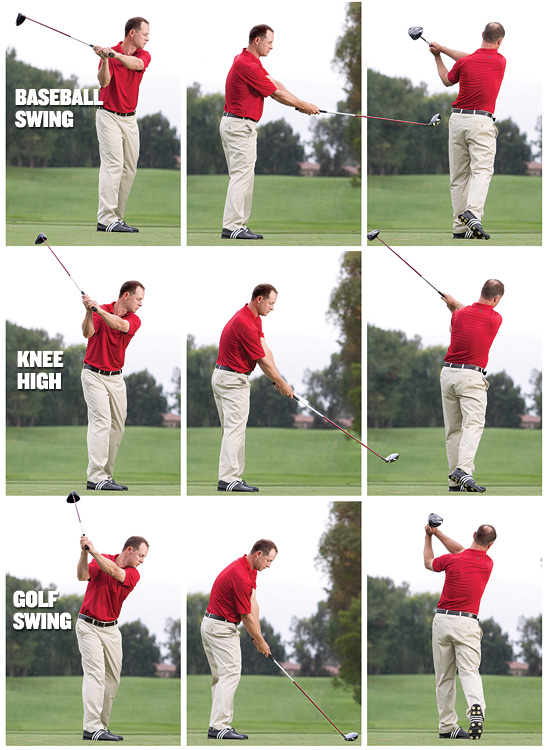
8. Power Release. To generate power, you have to practice releasing the club. The first way to do that is to sit in a chair that has no armrests so your back is flush with the chair back. Then, holding the club at eye level, make some swings, feel your arms rotate over and release correctly through the swing. Many times when we swing a driver, we try to overuse our body and forget that it's the clubhead that actually hits the ball. Sitting in the chair forces you to swing your arms and allows them to rotate through impact. This release will square up the face at impact.
After you've tried this drill, stand up and make a baseball swing, feeling the same concept as above. When you're standing vertical and swinging parallel to the ground, it's much easier to let your arms roll over and release. As you make these swings, make sure to keep your arms relaxed. Try to feel the weight of the clubhead as you swing. (I've never seen anyone make the baseball swing and have the chicken wing on their followthrough.)
Then, lower the club and make some knee-high swings, keeping the club as parallel to the ground as you can, while allowing the club to release and your forearms to roll over. Now set the club down for a regular swing and continue to feel the club release and your forearms to roll over as you swing through the shot. Again, always try to feel the weight of the clubhead when you swing, so your forearms roll over through impact.
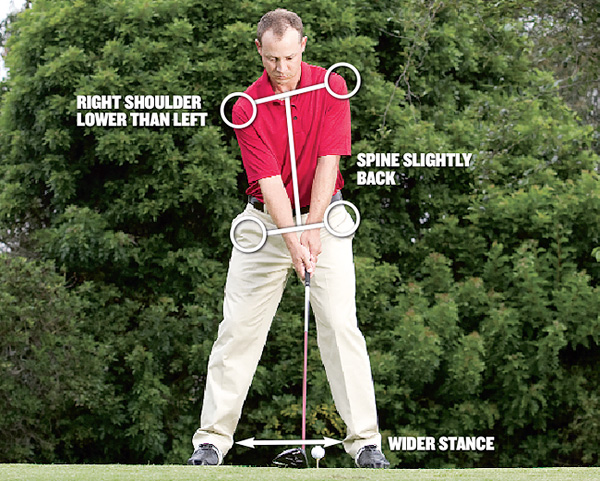
9. Power Setup. When I'm going for a few extra yards, there are a couple key setup fundamentals I incorporate to help reach that extra distance.
My stance is slightly wider than my shoulders. (I want to make sure I don't overdo it and have poor balance.) I have just as much balance with a driver as I do with a 7-iron. Since my right hand is lower on the club than my left, my body must fit in the same way. That's why my spine has a slight tilt back. My right shoulder is lower than my left shoulder, and my right hip is slightly lower than my left hip. This setup allows me to get into a great loaded position in my backswing. And the last and most important aspect of my setup is that my arms are relaxed so they can swing and generate speed with the clubhead. Remember this–tight muscles are slow muscles–so we want to be relaxed to generate maximum clubhead speed.
BONUS TIP: The driver is the biggest and longest club in our bag. You'd think that it would also be the heaviest, but it's actually the lightest. If your grip pressure gets a little tight, it's difficult to feel and swing the clubhead. (Remember, you want to have some speed in your swing.)To get a feel for the clubhead and relaxed arms, turn your driver upside down, hold it just below the clubhead and make some swings while keeping your arms relaxed, so you can hear the club make a swooshing sound in the impact area. (Try holding it too tight and see if it makes a swoosh. Betcha it doesn't.) Now hold the club normally. It should be much easier to feel the clubhead and should feel heavier than normal. That's okay. It makes it very easy to feel the clubhead through the swing.
Now, try to make the swoosh sound again, and if you can, it means your arms are relaxed and you have the speed to hit some long drives.
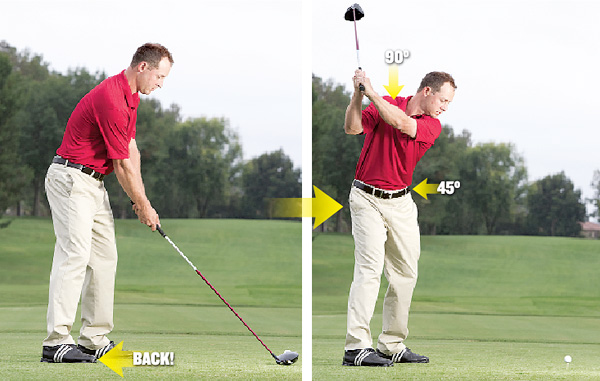
10. Preturn! If you're struggling to make a full turn, give yourself a little preturn that kick-starts your swing.
 WEAK NO COIL
Take a look at what I'm doing here. Ideally, I want to turn my shoulders 90_¡ and my hips 45_¡, so I can get loaded in the backswing and in the right position to swing the club to the inside of my target line. To swing from the inside, my body has to react to my arms in the backswing. It needs to turn and unwind. When it does this, there's room for the club to drop to the inside. If it doesn't, and I start the downswing with my arms and upper body, the club gets too upright, and I'll cut across the ball and either slice or pull it.
Getting loaded at the top of the swing isn't easy for a lot of golfers–it takes a lot of flexibility–but there's a way to pull it off. Simply drop your right foot back about three or four inches at address. This allows your hips to turn a little more because they've already started a slight preturn at address. By making this preturn, you'll have to do less to get your body turned and loaded. You're not closing your stance, just moving the right foot to make it easier on your body to make a full turn.
Nick Kumpis, PGA, teaches golf in Southern California.
Contact management E-mail : [email protected]
Copyright © 2005-2016 Outdoor sports All Rights Reserved