 1. Poor Balance?/Stick Your Finish Here's something to look for the next time you watch a professional golf tournament: Notice how, on great shots, the pros hold their finish and how, on bad shots, they don't. Why's this worth noting? Because, all too often, amateurs swing as if, once they hit the ball, nothing afterward matters. Just the opposite is true.
Whether you're on the range or on the course, I want you to swing fully into your finish. If you find yourself falling backward, then you've pulled the golf club through with your shoulders and hips rather than starting your swing with your lead leg and then swinging your arms. If you fall forward on your toes or start to walk after you've finished your swing, then your downswing started with your shoulders and you came over the top.
I tell my students to feel their swing from start to finish, and by finish, I mean to hold their finish. This keeps them focused through the ball versus checking out before the hit. 2. Improper Grip Pressure?/Hold It At 45_¡! Although you might think that most amateurs grip the club too tight with only their hands, they also typically hold it too tight in their wrists, forearms, upper arms and shoulders. Squeezing the club like this inhibits your swing and makes it virtually impossible to make a fluid motion.
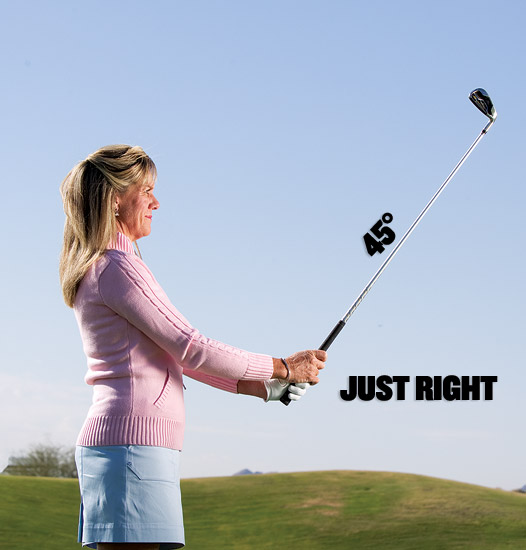


To find the ideal grip pressure, try this simple exercise with any golf club. Hold the golf club in front of your chest with the shaft and clubhead pointing toward the sky. Hold it as lightly as possible until the golf club feels as though it will slip out of your hands. This is too light of a grip. Next, allow the golf club to fall so it's parallel to the ground. Notice how the tension increases in your hands, wrists and forearms. Now your grip pressure is too tight. Finally, hinge the golf club to a 45-degree angle and begin to make little circles with your hands and wrists. Feel the weight of the clubhead. You now have the perfect grip pressure, like in the upper left photo.
Be aware of your grip pressure the next time you practice or play. You might find that you hold the driver the tightest even though it's the very club that you should be gripping the lightest (the driver is the lightest club in your bag, while the sand wedge is the heaviest). Find your perfect grip pressure and start making fluid swings.

3. Short Approach Shots?/Take The Right Divot! Losing distance on your approach shots? Here's a quick tip that'll add extra yards in no time.
Place a tee just opposite and on the outside of a ball to determine where you make a divot. If your divot is behind the ball, it indicates that you've started your downswing incorrectly (most likely your upper body has led the lower body).
Rather the divot should be in front of the ball, because good contact means that you've struck the ball first. This also indicates that the golf club is traveling through the ball.
When first practicing this exercise, begin with half swings and use a mid-iron so it's easier to make solid contact. Feel your forward arm leading the swing. This allows the grip end of the club to lead the face; as you swing, think, Pinch the ball, not Scoop the ball.
Without thinking mechanically about it, practicing this drill will improve your swing sequence, contact and distance .
4. Bad Swing Path?/Toss A Ball Under Your Driver! To hit the ball farther and straighter, try this simple ball-toss drill. Simply place the palm of your lead hand on the butt end of your grip and, with your other arm, toss a ball down the target line. Take note of where the ball flew in the air. This will help to get a better understanding of the swing path through impact.
 If I start down with my hands and shoulders...
 ...it causes me to come over the top...
 ...and the club aims left and the face stays open...
 ...resulting in a slice.
This is a great drill for any golfer who swings over the top, because it trains your arm to travel freely on the proper swing path. Also, your spine angle and tilt remain constant as the swing sequence becomes natural.
To make the ball go high, allow your arms to swing versus starting down with your hands. For a more advanced exercise, after tossing the ball under the driver, try swinging a wedge with one hand and hitting the ball while holding the driver with your leading arm. If you try too hard, the club will hit the ground; if you let it swing freely, you'll make surprisingly crisp contact. The goal with this drill is to feel the swing, not the hit.
 By tossing a ball, however, I unwind naturally...
 ...letting my hips rotate toward the target...
 ...and my arms follow, so my path is correct.
To improve your consistency, warm up each session by throwing five to 10 balls under hand.
5. Poor Rhythm?/Whip It Good! One of my favorite training aids is called the Orange Whip. It's great for golfers who tend to swing too fast. I put quotes around that because what people usually mean when they say you've swung too fast is that one's chest and shoulders started down before the backswing finished. Paradoxically, this out-of-sync motion actually creates a slower swing through impact.
When you use the Orange Whip, a flexible shaft with counterbalanced weights, however, this can't happen. Why? It ingrains a rhythm and syncs up your hips and core so you can hit the ball farther and straighter.
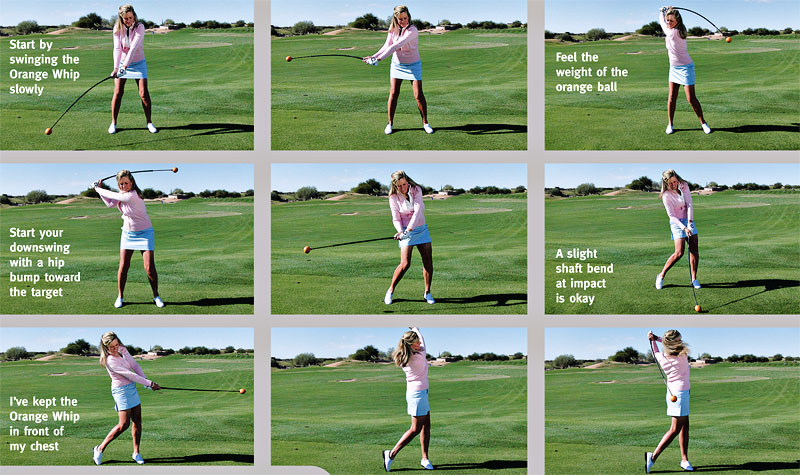
Here's how to use it: Swing the Orange Whip both right-handed and left-handed to balance your muscles on both sides. Note how the weight of the orange ball produces a natural pause at the top of your swing? This brief moment of rest makes it easier to start your downswing in the proper sequence, allowing your lower body weight to shift toward the target and your upper body to follow. At first, you might feel as though you're swinging slower, but you aren't. In fact, you'll be swinging on the right path and generating the right speed at the right time.
6. Poor Swing Sequence?/Place The Grip In Your Belly! Here's a great exercise that'll help you understand the correct swing sequence. All you have to do is place the butt end of your grip in your belly and make a swing. This will help keep your arms in front of your chest.
While many amateurs either start the swing with their hips or use only their arms, this exercise helps create the correct in-sync sequence.
Here's how to do it: Stand erect, choke far down on the club so that the grip end of the shaft sticks into your belly button. Next, push the golf club back while keeping the relationship between your arms, chest and shoulders the same. After completing the backswing, start your downswing with your legs while the triangle remains the same.


Next, bend into your golf position and put the grip end into your belly button. Make a backswing and when the motion is complete, lift the club above your back shoulder to the top of the swing. Then, as you begin your followthrough, replace the grip end back in your belly button. This will help you to avoid pulling through with your shoulders.
If it helps, practice this in front of a mirror so that you can see and feel the triangle effect that's created between your arms, chest and club.
7. Bad Alignment?/ Conquer Your Aim!


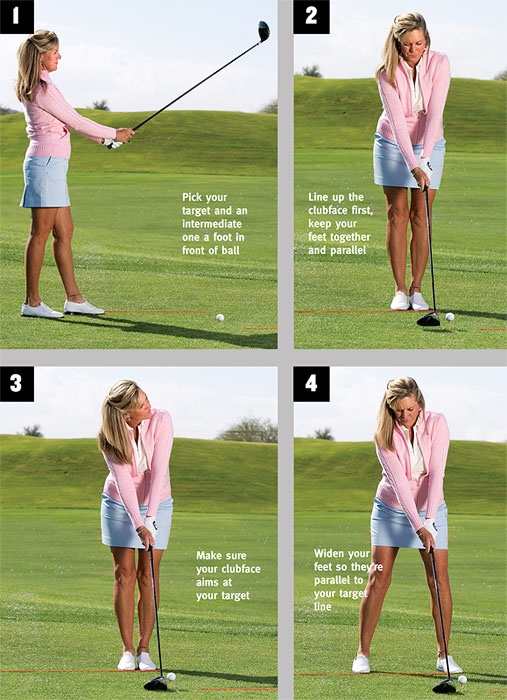
Most amateurs don't properly aim the clubface in the right direction. If they aim at a distant tree, their club might be aimed well left of it, or their body well right, or both! When that happens, you have to make a lot of compensations in your swing to hit your target. While this might occasionally work, it'll eventually lead to major swing flaws.
Whether it's a putt or a drive, always follow this sequence to ensure proper alignment: First, aim your clubface, then your feet and finally your body. Never place your front foot in front of the center of the ball until you've set the clubface behind the ball. If your feet walk in front of the ball, you'll line up closed to your target line.
To ensure that you're properly aligned, practice with some simple colored alignment sticks (golf shafts work well, too). First lay a stick down so it aims at your target, then another one that's parallel to your foot line. Finally, add one more so that it runs perpendicularly from the ball back to the foot line stick. (The perpendicular stick helps show proper ball positioning.) If you've watched Tour pros practice before a tournament, I bet that you've seen them doing this.
Once you feel confident that your alignment is good, remove the sticks and address the ball the way I suggested above, making sure that your body and feet lines are parallel to your target line. Then lay a stick or club against your toes and see if it's parallel. You can't take the sticks on the course, so perfect it on the range first.
Susie Corona, LPGA, instructs at the PGA Tour Academy in Scottsdale, Ariz. She's a member of the Puma/Cobra staff. For more info, visit www.susiecorona.com.
Ted Takasaki Wins 38th Annual South Dakota Governor's Cup Walleye Tournament

Electric Bike Conversion Kits: Reclaim Your Cycling Freedom

Enhance Baseball Performance with Flexibility Training

Copyright © www.mycheapnfljerseys.com Outdoor sports All Rights Reserved