Have you ever wondered if what you see in magazines (yes, even this one) is showing you what you need to see? Or how about in video? Can the camera sometimes skirt the truth? The quick answer is yes, and if you're like many who record themselves on video, on high-speed photo capture or via any sort of lens, sometimes, the camera can play tricks on you. How so, you ask? Read on, and check out how if you don't get the right shot with the camera, you're toast.
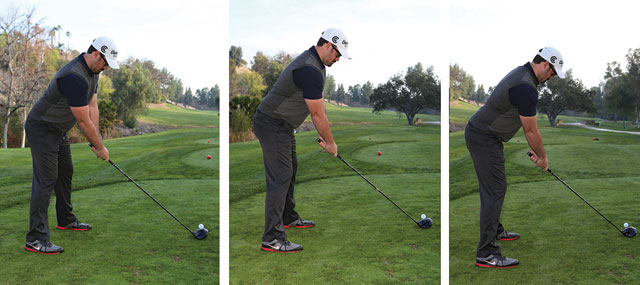
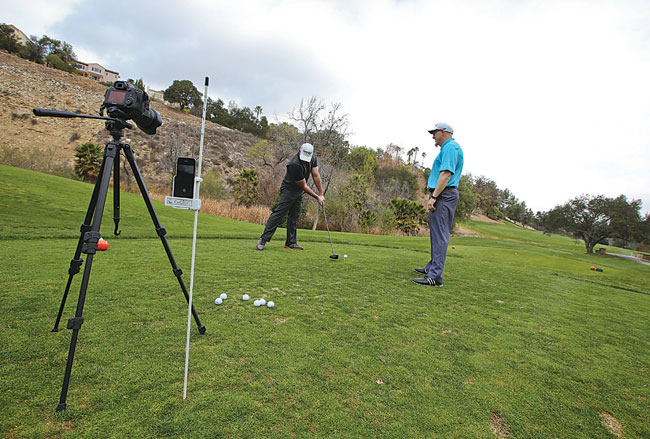
WHICH PHOTO IS TELLING THE TRUTH? Most golf instruction photos and video (I'm just going to refer to video, video stills and photo as "images" from now on) are from one of two angles. The first is from what we call "face on," which, as you can see from the three photos above, is in front of the golfer facing his sternum. This position is useful in many ways, but first we're going to look at how it works for the setup.
When setting up over the ball, you want to be able to look at things like ball position as it relates to your body, shoulder tilt, shaft lean, feet orientation, whether flared, square or a mix of both.
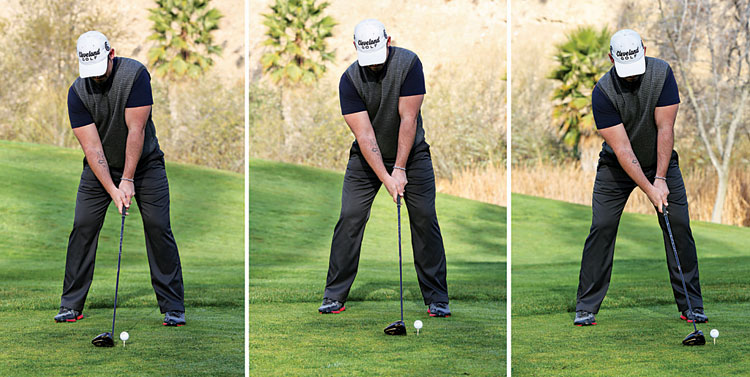
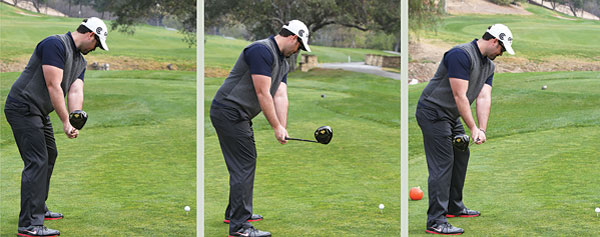
Now, here comes the interesting part. My student, Jeff Stearns (a solid amateur player, by the way) is set up over the golf ball in what I consider to be a good position in each of three photos above. And get this, Jeff didn't budge an inch as we took three photos from three slightly different angles.
Shocking, isn't it? The biggest difference you can see in these images (from this vantage point) is the ball position and the position of Jeff's hands. If you only had the left image to look at, you'd assume Jeff might be playing the ball too far back in his stance, with a clubface angle that's a hair open. If you looked at the upper right photo, you'll see Jeff playing the ball well forward in his stance with a slightly closed face. The left image? Look for a push slice to follow from that position. And as for the right image? I'll bet he pull-hooks it from there.
In reality though, Jeff is in a perfect setup position, and the upper middle photo is the only image telling the truth. The key is to position the camera face on, in front of the golfer's sternum, at waist high.
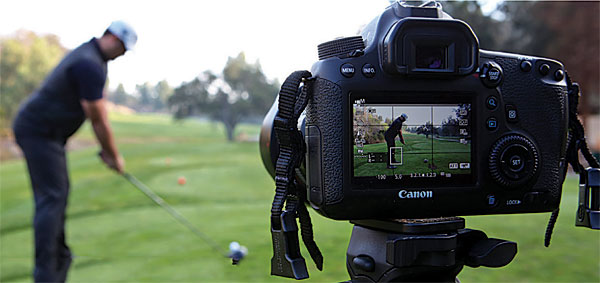
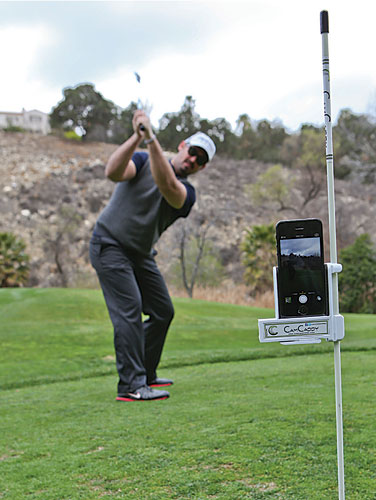
WHAT TO USE Make sure you record video at the highest frame rate. This allows you to slow the footage down for a smoother slo-mo playback. I like to use at least 60 fps (frames per second), or if I can, I sometimes go as high as 120 fps or more for even better slow-motion video capture.
The iPhone 5S records at 120 fps, and many DSLRS, camcorders and cameras record at 60 fps, at least. Also, you'll want to use a high shutter speed to prevent a distorted "rolling shutter" effect, which makes the shaft look like it's drooping or bending backwards. The higher your shutter speed, the better your footage will be.
WHAT YOU WANT Once the camera is positioned properly (waist high, in front of your sternum), look for the ball to be positioned well forward of center toward the heel. If your grip is fairly neutral, the hands should be mid-body with the shaft nearly vertical to the ground. With the wider stance and forward ball position, the right shoulder should be lower than the left. I prefer both toes to be flared out slightly to promote more hip turn and better use of the lower body. The setup should promote a feeling of being able to hit both "up" and "out" through impact. If you don't get a head start at address, impact gets pretty difficult.
DON'T BE FOOLED! In addition to a face-on camera angle, I like to use what we call a "down-the-line" (DTL) field of view. From this angle you can get a great feel for the geometry of the swing that's produced by the alignments of the clubface and the swing path.
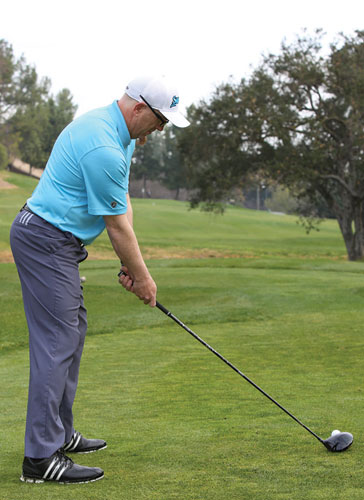 When I look at a player from this camera angle, I check the alignment and posture first. Ideally the feet and shoulders will be slightly right of neutral and an extension of the shaft will point at the belt buckle.
That said, we haven't started to swing yet. Let's look at the setup and see if Jeff is aligned properly. If you look at the three photos above, you can see three distinct setup perspectives. If you were looking at the photo at upper left, you'd assume Jeff was aimed left, but had a very closed stance, shoulders and clubface. Looking at the upper-right photo, it would appear that Jeff is aiming to the right, with a relatively square setup position. It's not quite as dramatic as the upper-left photo, but even still, both images aren't telling the truth.
The reality is, Jeff is in the exact same setup position in all three images. All we did was move the camera! The upper photo in the center shows Jeff set up properly. Like so many great drivers, Jeff hits "up" on the ball through impact. As a result, he needs to aim his feet and shoulders right of what would be considered square to keep the path working from the inside at impact. Without the subtle change in alignment, the "up" angle of attack would produce a path going left through impact and make hitting his desired slight draw impossible.
Pretty incredible how the camera can deceive you, right? The proper camera position is waist high and dead center between Jeff's waist and the golf ball. Any further to the left, right up or down will give you false information on what's actually happening at the setup.
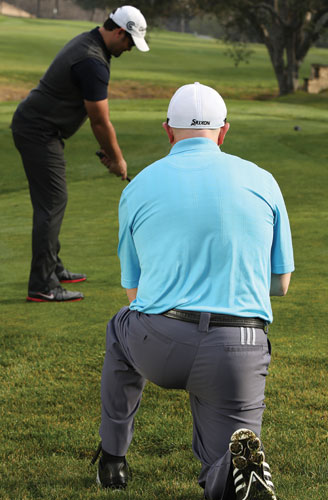
TAKE A KNEE Why should the camera be set up at waist high? For the simple reason that waist high is the middle of a golfer's body. Any lower or higher will show you slightly different results.
To illustrate, think of how you'd look at one of today's flat-screeen LCDs. If you're too high, low, left or right, the screen loses clarity and light. But if you're dead center, you'll yield the best viewing results.
GET IT RIGHT! With the camera positioned properly at waist high and midway between the toes and the ball, you're ready to go. If a neutral position is your goal, and it should be, here are a couple of points of interest in the takeaway. The clubhead, when it's parallel to the ground, should hide your hands. When coupled with the proper connection between the left arm and chest from address, the clubface should be parallel to the left arm and spine angle. While this isn't mandatory for good ball-striking, eliminating all things bizarre will really help solving problems on the fly. By the time you get to this picture going back, you should see more left leg than right if the pivot is working correctly.
Here we go again. When looking at the takeaway from down the line, if the lens isn't situated right, you're in for a world of hurt.
Obviously, the image on the upper left is the correct one. The camera is waist high, the clubhead is close to covering the hands, and the body is making a correct pivot away from the golf ball.
If you only had the middle photo to work with, which is shot with the camera too far to the left along the toe line, you'd not only see the club look as though it's moving outside the line going back. If the camera is lined up properly and you see this takeaway, it's likely the downswing will be steep, and the path well left through impact.
Finally, if the camera is too far to the right and along the target line, it will look as though the golfer is taking the club back to the inside too much. If you're seeing these pictures from a good camera location, the club will likely be across and have all the problems usually associated with that mistake.
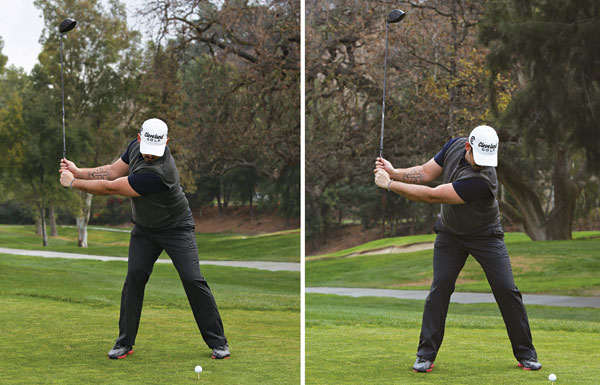
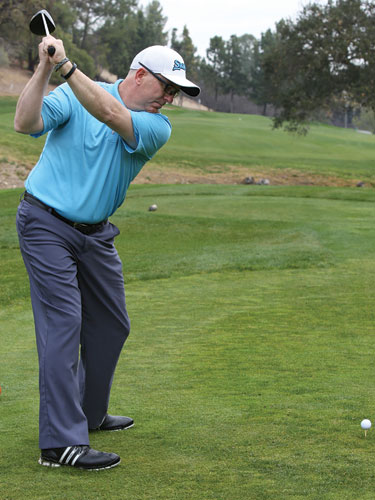
TO THE TOP (FACE ON) While the DTL camera angle gives you great feedback about your geometry, the face on view helps you see your physics. The pivot is best viewed from this camera angle as it gives you a chance to monitor rotation, lateral motion and explosiveness through impact. Their appears to be an enormous difference in the two backswing positions in the above photos. Once again, this is only due to a change in camera location. The picture on the left is taken from the proper angle with the camera in line with the sternum, the photo on the right is shown with the camera outside the back foot. Not only does this make the ball appear to be too far forward in the stance, but makes it look like the upper body hasn't turned at all. Now that I have beaten the horse completely dead about camera angles you can see how screwed up any player not knowing how important this issue is can become by not being precise.
When it comes to the face-on view, I want to see a couple of things out of the pivot going back. The right hip should be closer to the target at the top of the swing than it was at address. This encourages the weight to move in a positive direction toward the target as the downswing begins and enables the club to attack on the proper path. With the drive, the last thing I want to see is the head moving toward the target on the backswing. If the head goes the wrong way going back, it will either stay in front coming down creating too much of a downward strike or retreat away from the target causing a flip through impact.
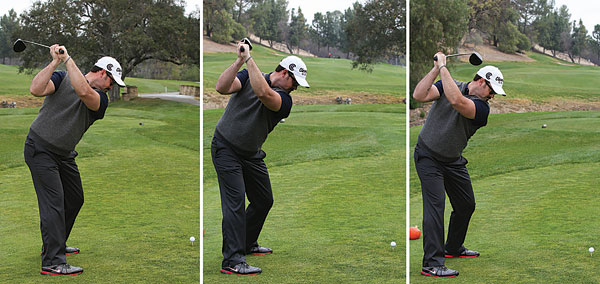
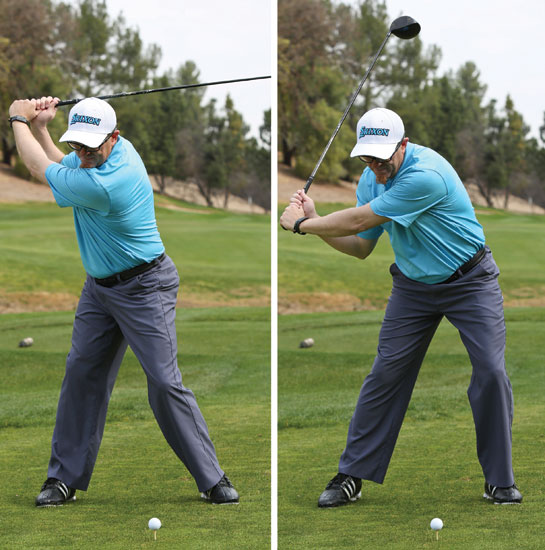
TO THE TOP Have I made my point yet? Let's look at three vantage points again, with Jeff not changing positions at all in any of the above pictures. The upper-left photo shows Jeff with the club "laid off" as we call it, meaning, it's pointed to the left. This is a mistake that leads to steep downswings and outside swing paths at impact.
Skip the upper-middle photo (we'll get back to it) and jump to the upper right. You can see Jeff at the top of his swing with the clubshaft pointing to the right of his intended target line. What happens from here? While many great players have played slightly across at the top, it can lead to blocks, hooks and "getting stuck" coming down.
Back to the upper-middle photo. Jeff is in his ideal position; his body turned freely to the top without excessive sway or a reverse-pivot right leg. Again, with the camera between Jeff and the ball at waist high, we get the most accurate shot of what's actually happening in his swing and how to fix any mistakes along the way.
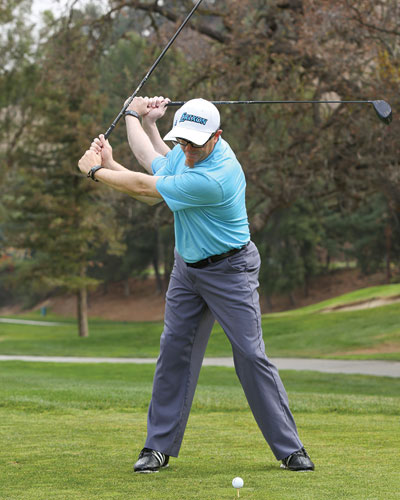
The simple fact is, there are dozens of combinations of positions at the top that produce great shots. The position I'm in on the right is one that I strive for in my own swing because it's fairly neutral. The leading edge of the clubface is parallel to the outside of my left arm, the left arm is running up through my right shoulder, right forearm matches my spine angle, and the left wrist is slightly bent. That's the beauty of using video properly, you can film yourself when you're hitting the ball well and use it as your own personal coach when things go south. The important thing to remember is to always use the same camera position so you're comparing apples to apples.
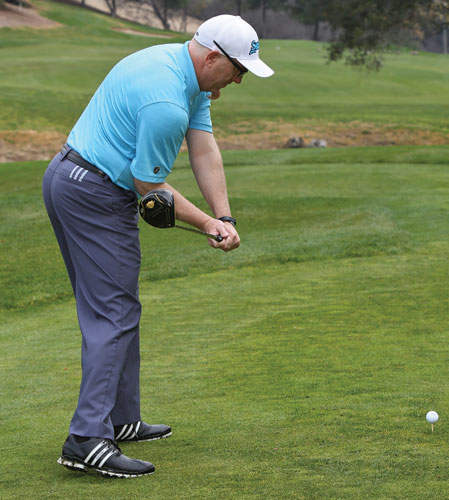
DON'T SCREW THIS UP! There isn't much time to adjust the swing once the downswing has begun. Trying to micromanage the swing at this stage is a recipe for disaster! Instead, try and think of one thing. There's a ton of room for personal interpretation of the swing going back, but if there's one commonality we've seen from great ball strikers since the days of Hagen and Jones, it was that we start the downswing. From the face-on view, make sure the weight is moving in the direction of the target before the arms and hands come down. If you don't get the weight moving across (especially from the ground up through your stomach) you'll be inconsistent with the contact and inevitably lose a great deal of power.
Don't try to "hold the angle," "lag it" or "delay the release". Instead, relax the hands and arm, and move the weight across, preferably into the left quad and front of the left foot. This will give you all the "lag" you ever wanted for the best chance to reach your potential as a ballstriker.

COMING DOWN This is another great example of how a change in camera angle makes the same swing look completely different. With the camera placed too close to the "toe line," (upper-left photo) the club appears to be well outside the desired swing path. When placed too close to the target line (upper-right photo) the club appears to be stuck too far inside approaching impact. In the "Goldilocks" photo in the upper middle, the shaft is running down the right forearm in the perfect slot position. If you're making adjustments to your golf swing based on the faulty pictures to the left and right, you'll be going down a dark rabbit hole and may not see the sun for some time. The only thing worse than no information is bad information. So make sure the camera is where it should be. Again, between the target line at the toe line at waist high.
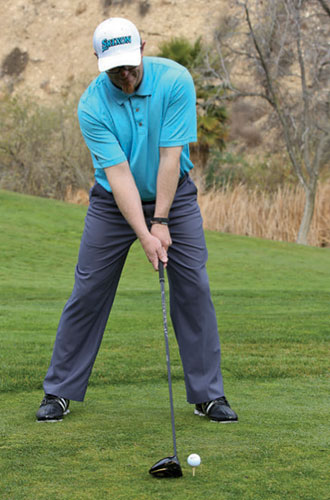
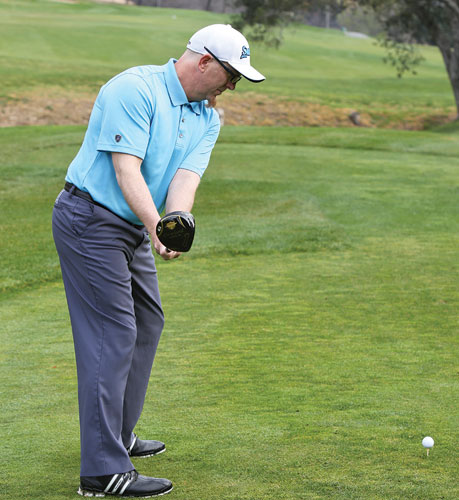
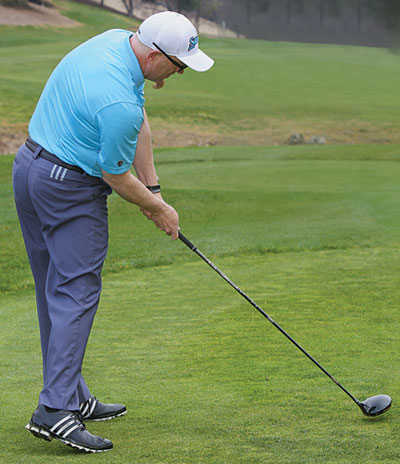
Once again, this photo of me shows a very neutral position approaching impact. I concede that there are many effective ways to swing the club, but for me and many of my players, these alignments produce solid shots. The leading edge of the clubface is "square" as it's perpendicular to the ground, the right forearm is down and in front of the right hit, the right shoulder is lower, indicating the proper tilt has occurred, the inside of the right foot and ankle are "rolling" toward the left, and my shoulders appear more closed than my hips. When I see myself looking like this, I have more hope!
Impact is the end product of all the hard work you have done on your mechanics from setup, the backswing, the top and the transition. When done properly you should see the right shoulder and arm closer to the ground than at address, the hips forward toward the target, the right foot rolled down with the heel slightly off the ground, the "cheeks" squeezing together, and the tummy working up and around to the target. Posing in this position around the house and at the office may provoke strange looks from your dog and co-workers, but it will give you a chance to "paint the picture" of the proper alignments in your feel to help you improve.
DON'T BE AFRAID TO USE IT! The last thing I want is for this article to discourage you to record your swing. Sure, some instructors are using more radar-equipped tools (such as Trackman and Flightscope, etc.) to compile data, but there are still very practical uses for capturing video. And in case you need something to slow your video down, there are numerous smartphone apps and software programs that do a great job of slowing down footage for you to see your swing in slow motion, frame by frame. Some apps and programs even allow for drawing lines and shapes and offer split-screen comparisons of two swings.
I use video in my teaching. Not always, but it still remains a viable and important part in helping me see what my eyes sometimes can't. Get out there and start filming yourself (or get a buddy to help), and stick to my guidelines for camera placements and what you should see from those placements. You'll reap the rewards and have a much better chance at playing better golf than you would trying to fix your swing problems from an incorrect angle. Trust me. I've been down that road myself (not to proud to admit), and knowing the right place for the camera will make all the difference in helping you become a better player.
Brady Riggs, PGA, resides in Southern California and is one of the most sought-after golf swing experts in the country. For more info, visit bradyriggs.com.
Identifying Vintage 3-Piece Bamboo Fishing Rod - Potential Aluminum Handle
Fantasy Baseball Playoffs: Identifying Reliable Utility Players
Walleye Fishing Strategies: Proven Techniques for Lake Erie Success

Copyright © www.mycheapnfljerseys.com Outdoor sports All Rights Reserved