 EIGHTY-FIVE PERCENT OF THE INFORMATION people take in is visual. That is,what we see is most of what we know. Consider the last movie you saw. I bet you remember more of what you saw than the dialogue you heard. The same goes for golf. What you see on the golf course is often what you get. (If you've ever fixated on a water hazard only to hit your ball in it, you know what I mean.)
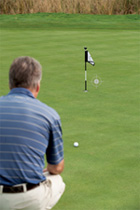
 WHAT HE SEES
Because our images are so important, it's vital that we have positive ones. Over the next eight pages, I'll show you how to apply visualization techniques to your putting. I'll identify the five different ways people putt and tell you what they see and how they practice (even if one method shouldn't be emulated).
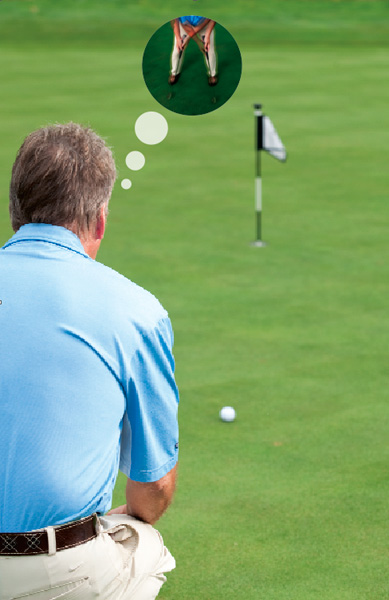
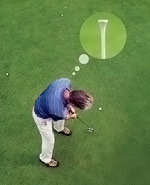
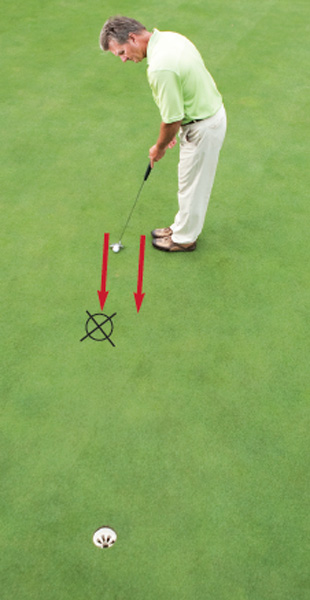
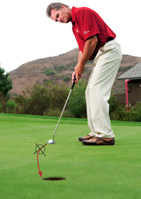
I'm sure you'll recognize your putting method in these photos, and I suggest, if you're not satisfied with your current routine, to work your way up to the most successful type of putter.What type of putter is that, you ask? Read on to find out. 1.THE MECHANICAL PUTTER HOW TO PRACTICE IT Because the mechanical putter is stroke-focused, he likes to use either a training aid to help him groove an arcing, on-plane stroke, or a flag stick (shown here) to ensure his stroke stays straight. I don't recommend you practice like this or become a mechanical putter, because it makes you ignore your putt's distance, speed and direction. (Speed is the most important part of putting.) If you're a mechanical putter, I suggest you stop putting this way and read on! There's a lot to learn from the other four types of putters.
 HOW TO PRACTICE IT
 WHAT HE SEES
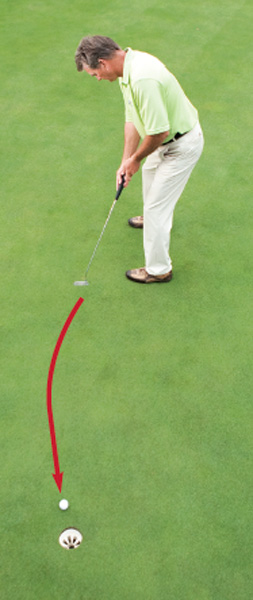
2.THE SPOT PUTTER When the spot putter reads his putt, he identifies a spot (a spike mark, discoloration of the green or old ball mark) and hits his ball toward it. Spot putters tend to be nonvisual in nature and use the spot to determine how far and in what direction they should putt the ball.
 HOW TO PRACTICE IT
(Note here that I'm aiming at a spot just beyond the hole. That not only gives me an aiming point, but, because it's beyond the hole, also gives me pretty decent speed. After all, I don't want to leave any putt short.) The better my visual image of the spot as I stroke the putt, the better my speed will be.
Place three tees at three different distances from you. (It may be hard to see in the picture at right, but I've placed them 10, 20 and 30 feet away.) Aim each putt toward a tee. Then, as you make your stroke, picture the corresponding tee in your mind's eye.
With enough practice, you should see the tee (and, hence, remember where and how far away it is) when you look at the ball. This will help you retain your target, and gauge the correct distance, too.
 WHAT HE SEES
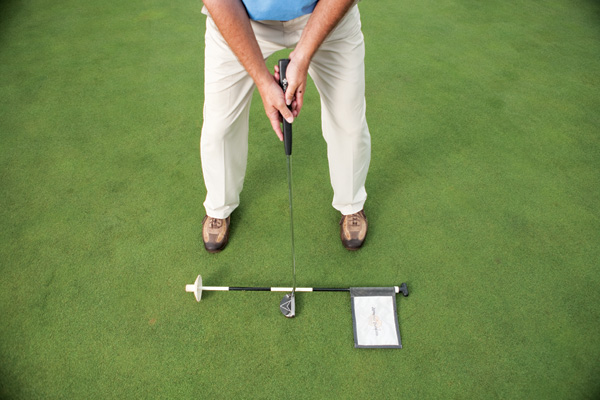
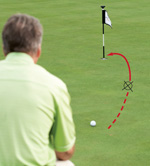
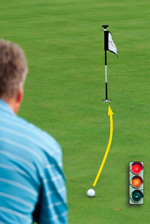
3.THE LINE-TO-SPOT PUTTER When the line-to-spot putter reads his putt from behind the hole, he sees a line going from the ball to the hole. When he stands over the ball, he sees a straight line extending down his target line that ends at a spot where he wants his ball to finish. He holds a picture of the spot as he strokes his putt.
When you read your putt from behind the ball, visually track the line from your ball toward the hole. Then choose an intermediate target on your line four to five inches in front of your ball. Aim the brand's logo or a line on your ball at that intermediate target.
When you stand over the ball, adjust your setup until it visually appears that the line drawn on your ball goes right through your intermediate target. Visually continue to extend that line to a spot that's the same distance you want your ball to roll. Adjust the spot accordingly to control your speed for uphill and downhill putts.
HOW TO PRACTICE IT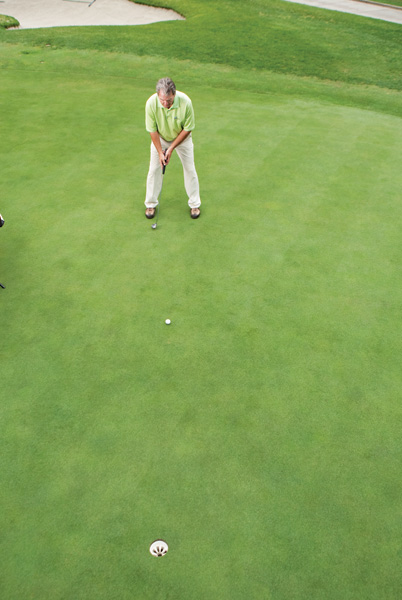

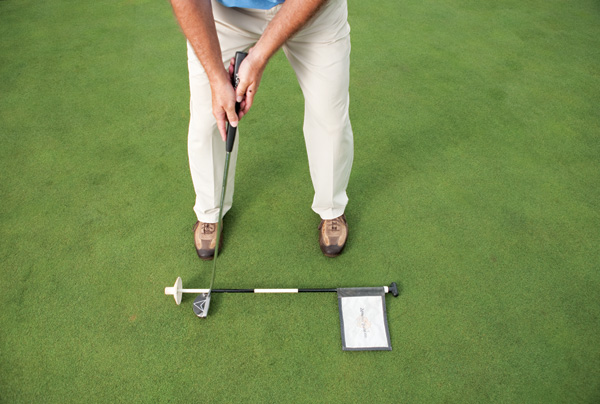
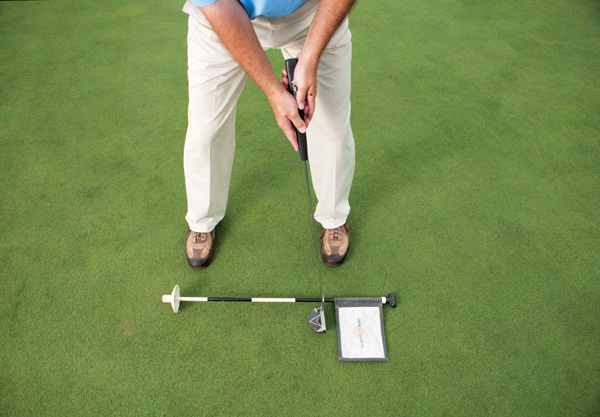
 I've chosen an intermediate target and aimed my ball at it. Now I rehearse my stroke and visualize the line extending from my ball to the hole.
Next I make sure my putter is aimed at the spot and my body is parallel to the target line.
I extend my target line through my intermediate target to a spot just beyond the hole (my putt's a little uphill). Note how I'm planning for it to break to the left.
I make a smooth stroke and hold my finish. Note how I haven't peeked to see where my ball's heading. This one looks good!
I've chosen an intermediate target and aimed my ball at it. Now I rehearse my stroke and visualize the line extending from my ball to the hole.
Next I make sure my putter is aimed at the spot and my body is parallel to the target line.
I extend my target line through my intermediate target to a spot just beyond the hole (my putt's a little uphill). Note how I'm planning for it to break to the left.
I make a smooth stroke and hold my finish. Note how I haven't peeked to see where my ball's heading. This one looks good!
 WHAT HE SEES
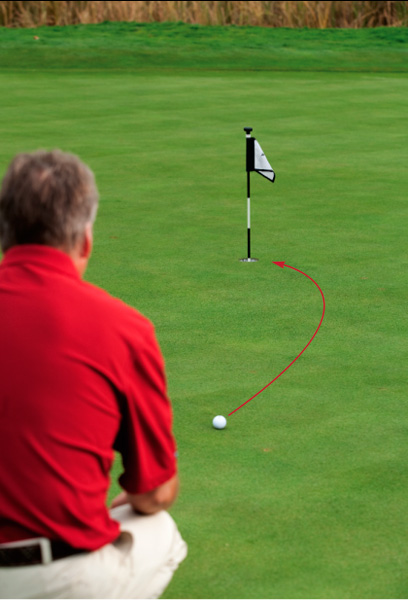
4. THE LINE PUTTER The line putter sees the curved line along which his ball will roll from address until it falls in the hole. On a flat putt and during his putting stroke, he has an image–in his mind's eye–of the ball entering the cup; on a downhill putt, the line ends short of the hole; and on an uphill putt, the line goes through the hole.
Aim your ball's logo (or the line you've drawn on it) at a spot four or five inches in front of your ball that's on your intended target line. Once you're satisfied that it's appropriately lined up, trace a line from your ball through the spot and onward toward the hole.
When you putt, the ball should roll over the spot and follow the imaginary line you've created toward the hole. A strong visual image will help control your ball's speed. Remember, the clearer the picture in your mind's eye, the better your speed control. Also it's important to know that your putt will travel the same distance as your last visual focus. Adjust your line for uphill and downhill putts to accommodate your desired speed.
HOW TO PRACTICE IT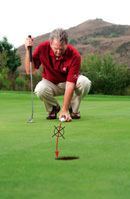
 I've decided on my line and chosen an intermediate target a few inches from my ball. From here, I aim the ball's logo at it.
Next, I make sure I aim my putter at the spot and trace a line through it just short of the hole (I have a downhill putt here and don't want to hit it too hard).
I make a smooth stroke and putt the ball so it rolls along the imaginary line I created when I lined up. My eyes look at the spot where the ball was.
I've decided on my line and chosen an intermediate target a few inches from my ball. From here, I aim the ball's logo at it.
Next, I make sure I aim my putter at the spot and trace a line through it just short of the hole (I have a downhill putt here and don't want to hit it too hard).
I make a smooth stroke and putt the ball so it rolls along the imaginary line I created when I lined up. My eyes look at the spot where the ball was.
 WHAT HE SEES
 HOW TO PRACTICE
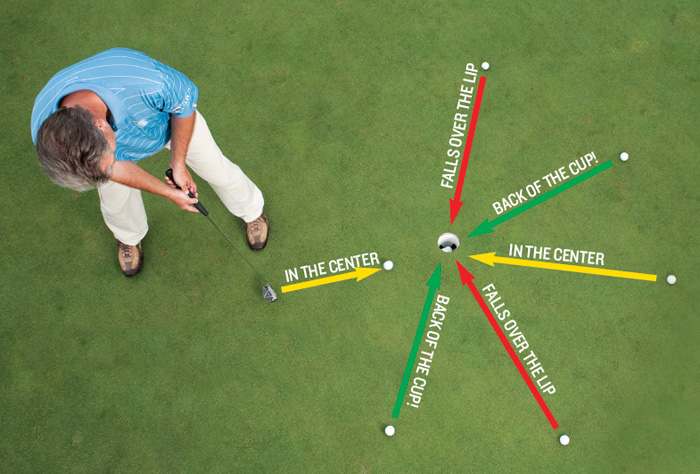
5. THE LINE/SPEED PUTTER The line/speed putter sees the ball travel on a line toward the hole and fall into it at his desired speed. Because of his acute vision and attention to detail, the line/speed putter is the most successful of the five. 1. Place 8-10 balls in a circle about three feet from the hole. 2. Close your right eye to eliminate unnecessary right-side peripheral vision. (Lefties, do the opposite.) 3. Stroke each ball with a different speed. Some should go in firm, some should just fall over the front edge, while others should be about medium speed. Note: For putters 2 through 5, your visual focus over the ball should be an image so clear in your mind's eye,that the ball is a blur. Hold that image as long as you can after the ball leaves the putter face. This will take practice. Also, you'll have your best success if you start your stroke as soon as your eyes return to the ball. The longer you stand over the ball, the more your image will fade. Your speed control will be off.

6. BONUS TIP: HOW TO HOLD AN IMAGE The better you can picture your target (i.e., the hole, spot, a line between your ball and the hole, or the speed of the ball into the hole), the better your putting will be. But you don't have to be on the putting green, or even have a putter in your hand to train yourself to be more visual. Take a look at the photo. I'm looking at an emergency bell that's just opposite the driving range at Arroyo Trabuco Golf Club, where I teach. I practice visualization by staring at the bell and keeping its image in my mind and then looking at the ball.
However, when I look at the ball, I don't see the ball. Rather, I see the bell. It's my target after all, and I want to make my stroke with my target in mind. You can try this anywhere, even in your office. Stare at a door handle, then look at a wall while retaining the door handle's image. You should be able to see that image for five seconds, and while this might not sound like very long, it takes practice to hold an image for five seconds, to the exclusion of anything else. With enough practice doing this, you'll have stronger images of your target. (Just don't do it when your boss is around!)
 ONE ON ONE WITH DR. DAVID WRIGHT
MY TEACHING PHILOSOPHY DEVELOPED FROM THREE YEARS OF RESEARCH I did in Dr. Frank Jobe's biomechanics lab at Centinela Hospital in Los Angeles. We placed 1,000 sensors in each shoe to measure center of force and static and dynamic balance. We also placed 40 light electrodes on our subjects' bodies and four on every club and putter they used. We also used eight high-speed cameras around the perimeter of the ceiling line to capture every setup position, swing and putt and a launch monitor to determine ball and clubhead speed and ball spin. In total, the research took three years to complete. We placed our subjects in 75 different setup positions, and they used four different grip sizes to swing and putt. Golf's fundamentals haven't changed. We've measured and refined the setup so that it should make instruction easier and players better golfers, regardless of what swing mechanics are being taught. You won't find a teaching pro who will argue with the importance of fundamentals and precise balance in setup and swing or putt. Balance and body symmetry are compatible with every golf swing that's taught. It's simply individualized to fit a person's body signature.
If there's a problem with the swing, 90% of the correction is in a player's balance (his or her setup). The other 10% of the problem resides in the swing's sequence.
Not everyone can set up like Tiger or have Davis Love III's hand position at the top of his or her swing. Each person has a personal body signature: a different spine angle and knee flex, a different shoulder tilt and hand and impact position at address, a different stance width, etc. That's why I measure every one of my students. Body symmetry shows up throughout a balanced setup and optimizes a player's ability to rotate more fully and place less stress on his or her body. I tell my students that they should practice their setup at home or in their office, not at the golf course or range. You can't think and swing at the same time. Golf is a game where you should have a 100% visual focus when you swing. You shouldn't think about club positions or path. Fifteen minutes a day is enough time for setup practice and motion drills so that your setup and swing become automatic within a couple of weeks. Whenever you put an instrument of any kind in your hands, your entire body makes subtle adjustments. When you place a golf club in your hands, it's no different. We all have different-sized hands, yet grip size hasn't changed. This makes no sense to me. The majority of club changes have been in shaft and clubhead. Very few things have been done with grips since the transition from leather to rubber. Most grip manufacturers make 4-iron and wood grip sizes. Clubs are sold with one grip size (standard–900 to 915 mils), and most players never change that size. Larger putter grips arrived en masse after K.J. Choi won on the PGA Tour with a very large grip. That's the mentality of the industry. If it works for a PGA Tour player,it must be good for all. There has been no science to support that transition. Our research shows that the grip size K.J. uses is likely good for many NBA players but not your average golfer. Grip size determines how well a player can get the club into the fingers for maximum power and control. Grip size impacts posture, balance and your full swing and putting motions. This was one of the breakthrough observations that came out of my research from Dr. Frank Jobe's biomechanics lab. We discovered a unique connection between balance, body symmetry, posture, stance width, grip size, and swing and putting efficiency. I call it the new science of the fundamentals. Players see an immediate change with their putting and swing when they have the proper grip size, stance width and ball position. Your ability to properly place your hands on the club in the fingers of your weak hand is totally related to grip size.When a grip is too small or too big, a player moves the butt of the club toward the heel of the palm. It's no coincidence that that's where you see the wear inmost amateurs' gloves.
We just launched a useful website, gripsize.com, where players can get their grip sizes, stance widths and ball positions for putter, irons and woods, plus instruction right from their personal computer. All you have to do is input a few measurements, and we'll e-mail your stance widths, and putter-, iron and wood-grip sizes. You can get any one or all of those measurements.
Dr. David Wright, PGA, teaches at Arroyo Trabuco Golf Club in Mission Viejo, California. To learn more about him and his teaching philosophy, visit wrightbalance.com.
Tecnica ICON ALU Dual Pivot Hinge Replacement - Direct from Tecnica

CAL Diving Club: Year-Round Diving Instruction in Northern California

Pacific Salmon Fly Fishing: Essential Flies & Techniques
Copyright © www.mycheapnfljerseys.com Outdoor sports All Rights Reserved