
Training with power can be a very effective way to customize your workouts. But how do you know if you're doing it right? You've purchased the equipment and subscribed to the tracking websites—but how do you know if the numbers you're seeing mean that you're getting faster and more powerful?
Follow these four steps to find out how to accurately measure your progress with a power meter.
A field test is the quickest way to evaluate your current fitness level and obtain baseline numbers to use to set up your training zones. The field test should be conducted after an easy day of riding or after completing a good warm up.
More: How to Train with a Power Meter
There are several methods of field tests that can be done. You may want to do more than one test to make sure that your recorded numbers are giving you similar results. For all of these field tests, the terrain on which the test is conducted is critical to the accuracy and validity of the results. Look for a flat to slightly uphill course, no stop signs and not extremely twisty. The test can be done on a trainer, as long as the resistance can be adjusted to create enough load to make it a true time trial effort. Below are the three most popular:
More: 11 Reasons to Buy a Power Meter
During these tests you'll want to record, at a minimum, heart rate and power. Other useful measurements to record include:
When recording the weather conditions during testing, try as accurately as possible to note the temperature, humidity and wind.
Once you've conducted your field test, you'll need to analyze the numbers. For the 30-minute test, you'll take the average Heart Rate (HR) for the last 20 minutes. This will become your Lactic Threshold Heart Rate (LTHR). Your average power for the entire 30 minutes will become your Threshold Power (TP).
More: How Accurate are Power Meters?
If you choose to do the 20-minute test, take the average HR and power output for the entire 20 minutes. The HR will become your LTHR. For power, you'll take 95 percent of the power number. This will become your TP.
For the 8-minute test, you'll take the average HR and power from both efforts, average them together, and use the HR for to get your LTHR and calculate 92 percent of that power number to obtain your TP. You don't have to do all three tests, but sometimes it is a good idea to do more than one to make sure your numbers are in the same ballpark.
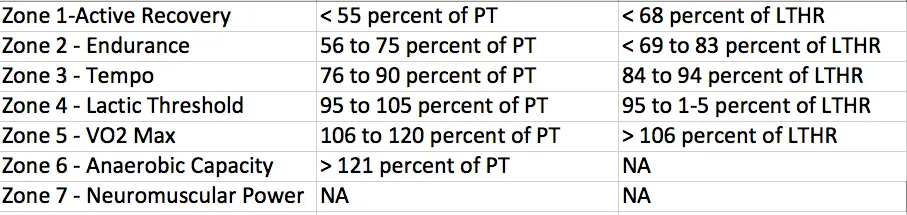
Once you have those numbers (Lactic Threshold Heart Rate and Threshold Power) you can use the following chart to create your training zones:
More: Best Buy: Power Meter or Heart Rate Monitor?
Depending on what phase of training you're in, use these training zones to develop a plan to meet your goals. As you begin training with power, you must know what level of fitness you're at in order to gauge where you want to go.
For example, if you are entering a race season and you're at a point where you want to improve your power at Lactic Threshold, your target workouts should involve a lot of time in zone 4.
More: 5 Reasons to Train with a Power Meter
In the beginning of this block, start with easier workouts, and each week increase the intensity. The intensity can be built by doing one or more of the following:
By increasing the intensity each week, you create an overload, which triggers your body to adapt. As you move to the next block, start at a higher level than you started the previous block but slightly lower from where you ended the last block of training.
The most overlooked period of training is often the recovery period. The recovery period is also the most important part of any good training plan. It's not the work that makes you stronger—it's the recovery.
More: 5 Ways to Increase Power on the Bike
The recovery period is where your body gets the time to rebuild from the strenuous work you've put it through. The key to recovery is planning your rest period at the right time. Many training plans consist of a three-week on, one-week off plan. During the off week, the athlete does very little training, and what training is being done during this period is focused primarily in the active recovery zone.
At the end of a four-week cycle, start over. Before you begin a new block of training, conduct another field test on the same road or as close to the same conditions as possible. Use this data to tweak your numbers and obtain new training zones based on your improvements.
By doing these monthly field tests, you'll ensure that you are training to the correct zones and measuring your progress correctly.
More: 9 Post-Ride Recovery Rituals
Top 3 Smallmouth Bass Lures for Spring Fishing

H. Schmidt Revolver .45 Short: Identification & Value

Become a Certified Diving Instructor in Thailand | Career & Travel

Copyright © www.mycheapnfljerseys.com Outdoor sports All Rights Reserved