
Hitting better iron shots is key if you want to shoot lower scores. It's really the great equalizer if you will–the link from the tee box to the green. If you hit great drives and are putting well, it's not going to matter if you keep hitting substandard iron shots. So let's look at a few positions in the golf swing you should pay attention to so you can start hitting better shots from the fairway.
StEP 1: SET UP FOR SUCCESS
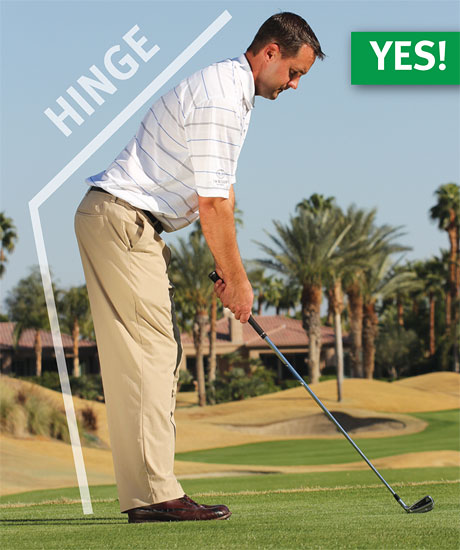
The setup is the easiest place to get things right. It's also a pretty common place to get it wrong. Look at these four photos. The left-side photos indicate a setup position I often see from my higher-handicap students, with the arms scrunched together and a lot of tension. And the moment tension creeps into your swing, consider your swing dead! The weight's on the left side and in a squatting position, with a fairly upright upper body. I'll bet this position comes from people being told to flex their knees and keep their elbows close together.
The correct setup is to flex the knees (yes, my knees are flexing under those slacks) comfortably, and hinge the upper body toward the ball from the hip. Bend as much as you need to so your arms hang naturally, and don't feel as though your elbows need to squeeze inward toward your chest. Neutralize your weight over both feet, and lastly, the left arm ought to be on the same line as the shaft, as seen in the face-on photos. And remember, there shouldn't be any need to reach for the ball. Let the arms hang naturally. Doing this correctly should lower the right shoulder–that's what you want.


STEP 2: GET TO THE TOP CORRECTLY
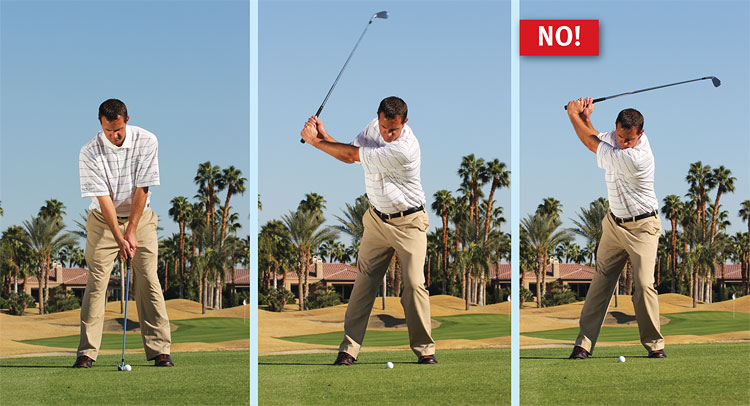
At the Jim McLean Golf School, we have researched thousands and thousands of golf swings from the best players in the history of the game and have found the best iron players have proper weight shift in their swing. In so many of my one of the major faults I see in the iron swing is the reverse pivot.
Here at the top of my swing (see opposite photo), you can see my weight has definitely shifted toward my right side. As you can see in this position, if you plant your weight on the inside of your right foot and keep your right knee flexed, your weight will be properly loaded in your right leg so that you can unload that energy into the golf ball.
If you hang out over your left foot at the top of the swing, you're going to have a tough time getting to the proper impact position. Instead, let your body weight shift as you rotate, and you'll get in the proper position at the top.
TO HINGE OR NOT TO HINGE I like to think of the hinge of the wrists as a gauge for controlling your shots. In the photo at right, I have a ton of hinge, much as John Daly had in his prime. I might be able to muscle one and hit the ball a long way from this position, but I'll likely suffer in terms of accuracy. Controlling the clubface with this much hinge is a tall order, but possible for some. The bottom right photo is probably my ideal amount of hinge with an iron. My left arm and the clubshaft form a 90-degree angle, there's good separation of the club from the body, and my weight is predominantly over my right side. I'd consider this a hinge I can control, and one where I can still feel the clubhead and the orientation of the clubface. And, still have plenty of power.
 POWER!
 SHORT!
 NORMAL!
Lastly, the top left photo shows a position with much less hinge, but one that can still enable a powerful move. J.B. Holmes swings like this and still manages to swing with incredible speed and power. So, choose the right amount of hinge that works best for your game. Within these guidelines, there's no right or wrong amount of hinge at the top of your swing.
STEP 3: THE TRANSITION


Once you've learned how to properly load your weight at the top of your swing, the key is to shift that weight toward the target while maintaining the hinge in your wrists as you transition down and into impact. See above? My hinge is holding as I shift and rotate my body toward my left side. There's no need to fling the club and cast it out–the club will fall on its own by properly shifting your body first! The early release of the hands can kill both your power and your solidity of contact. Instead, to hold the angle in your wrists for as long as you can, try this "Pump Drill" that I learned from Jim McLean. Do what I'm doing here in slow motion, and pump your downswing correctly by holding your hinge as your arms drop and your body shifts and rotates. Try it; I bet you'll put an end to any early release of the hands.
STEP 4: UNDERSTAND IMPACT
First of all, if anyone tells you your impact position should resemble your setup, don't listen to that person. The left picture is that of a good position at impact–you can see it's completely different than the position at address. Here, the proper impact position with your irons is one where the head is above or even slightly ahead of the ball, the shaft is leaning toward the target (with the iron, you need to hit down in order for the ball to go up) and the upper torso/hips rotated open. My shoulders are square to slightly open, and my weight has already shifted about 60%-70% to my left leg. This is the type of impact position that will lead to solid ballstriking where your divot is out in front of the golf ball. From here, finish the swing to a well-balanced followthrough where just about all of your weight is on your left leg. Do this and you'll start hitting better shots.
 YES!
YES!
 NO!
NO!

BONUS TIP! GET TOUCHY-FEELY If you want to start hitting better short shots around the green, no matter how good your mechanics are, you have to develop a good feel for distance. One thing I like to do when I practice is to make a few throws with the golf ball around the practice green. Why? Simple, it takes my mind off the stroke and helps me to determine how hard I'll have to hit the ball. You'll be amazed that without thinking too much about mechanics, your natural athletic ability will take over by having your eyes tell your arm how far to swing and therefore how far to throw the ball. Try it. Your distance control will greatly improve.

When it comes to practicing your putting, when was the last time you practiced putts at different distances, all on the same line? Be honest! Probably not recently. A great drill/practice routine is to line up some golf balls all on the same line, at distances around 10, 20 and 30 feet. Hit one putt at each distance and notice how the different lengths of your swings will result in hitting the putts different distances. With this drill, you'll develop better distance control and lag putting. By doing this quick drill before starting your round, you'll also be able to determine how fast or slow the greens are rolling on the course that day.
Top-25 Instructor Jon Paupore, PGA, is the Director of Instruction at the Jim McLean Golf School at Red Ledges in Heber City, Utah. Visit redledges.com.
Jetty Fishing Guide: Tips & Techniques for Tillamook Barview

Kayak Fly Fishing: Mastering the Challenges & Rewards
Land Big Carp in Small Waters: Proven Techniques & Tips

Copyright © www.mycheapnfljerseys.com Outdoor sports All Rights Reserved